JERRARI3D.com A new generation of the popular Lack Enclosure Drawers.
The Gen2 Lack Enclosure Drawers are part of the GEN2 Modular Storage System I designed which features a simplified installation method that allows you to rearrange and customize layouts in minutes.
Originally designed for the “Original Prusa i3 MK3 ENCLOSURE…”, The Lack drawers have found their way on to many desks, workbenches, and other tables as well.
Now with the Gen2’s rail design you can quickly swap the storage units between work areas.
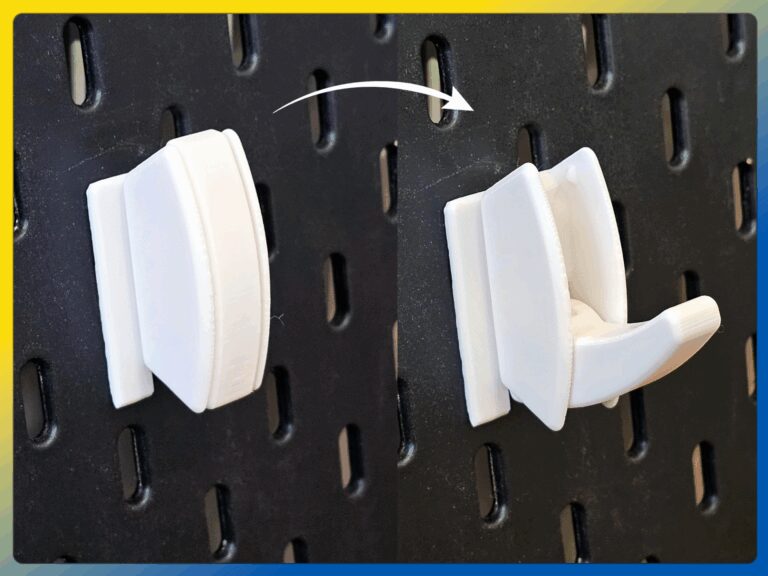
Introducing GEN2 QuickLock!
UPDATES 01/07/2024 • Added Triple and Quad drawers (standard length) • Updated all drawer cases to V3.3, these are updated for reduced drawer friction, warping, and material • Drawer Labels!
Each drawer has a version with a label insert available.
With PrusaSlicer 2.7.1+ you can easily change the text to anything your heart desires 10/11/2023 Tool insert holders designed to fit some of the most 3D printer tools and accessories GEN2 Tool Organizer Inserts By Mr.President Download HERE 10/2/2023 The 1st of my tool inserts have been added.
The first version fits the Tools received with Prusa MK4 Printers.
I have more in the works for the rest of the Prusa Line up.
Tool Organizer Drawer inserts – MK4 Download HERE Features: • Gen2 rails allowing quick and easier swap-ability and combinations of many Gen2 Storage System designs. • Lack Drawers also include optional slots for magnets allowing drawers to snap into place with a nice “Click”. • Drawer stoppers keep your drawers from attacking your feet. • Designed for larger and easier to install wood screws over the original lack enclosure drawer design.
HARDWARE • Screwdriver • Countersunk woodscrews: (Metric: 4x25mm to 4x16mm) or (SAE: #6 or #8 up to 1″ long) • Drill bit that is smaller diameter than the wood screws • Pen, Marker, or Scratch Awl • Magnets (Optional): 10x5x2mm or 10x2mm • M3 nuts • M3 Screws M3x6 – M3x10 INSTRUCTIONS • With a marker or pen use the GEN2-QL rail to mark the hole locations on the surface you are mounting. • Drill out marked locations using a drill bit smaller than the diameter of the wood screw you will be using. • Prep the rail for installation by installing M3 nuts into the hexagonal holes.
You can use a M3 screw to position and tighten the nut in place. • Install the rail using wood screws, use at least 4 screws on the outer corners to mount the single rail and and 6 to mount the double rail. (extra screw holes are available s, but you in the list on the right of the screen, hover over “Add Part” and select “Add Cylinder” • With the cylinder selected, in the “Part manipulation” menu in the bottom right, uncheck the lock next to size, set the “x” and “y” value to 10mm and “z” to 0.25mm.
If the cylinder is floating above the print bed you will need to select “Drop to bed” in this menu as well.
Place and copy these cylinders in any corner of your print to mitigate lifting off the bed.
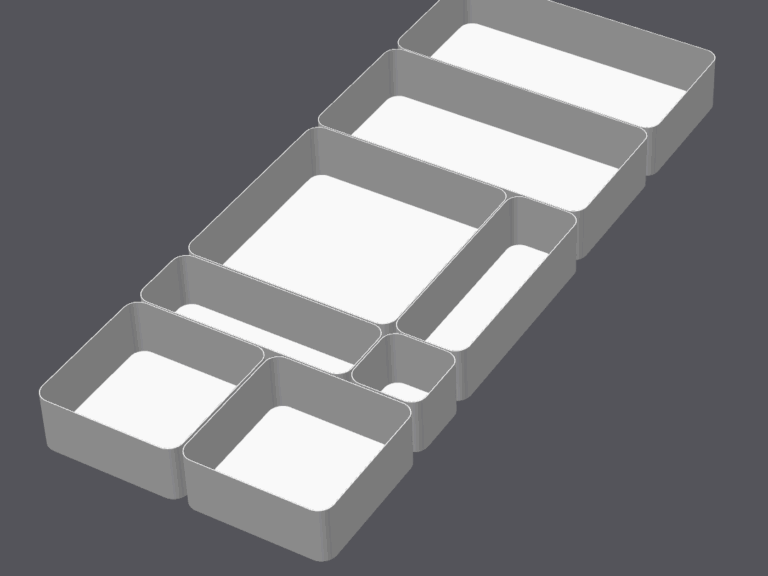
RECOMMENDED PRINT SETTINGS Filament: PLA (PETG or ABS for heavier duty storage) Nozzle Size: 0.4mm Print Height: 0.2-0.35mm Infill: 10-20% NOTE: The new cases in this design are backwards compatible with drawers from the original Lack Enclosure Drawers design GEN2 COMPATIBLE PRINTS GEN2 Hex Bit Inserts Download HERE Gen2 Adjustable Steel Sheet Holder Download HERE Gen2 Open Bin Lack Drawers Download HERE Gen2 Gridfinity Drawers Download HERE Gen2 Parts Drawers Download HERE GEN2 Steel Sheet Holder V2 for Lack Enclosures Download HERE Gen2 Slim Lack Enclosure Drawers Download HERE Gen2 Modular Lack Enclosure Drawers Download HERE